Program: Liquid crystal display
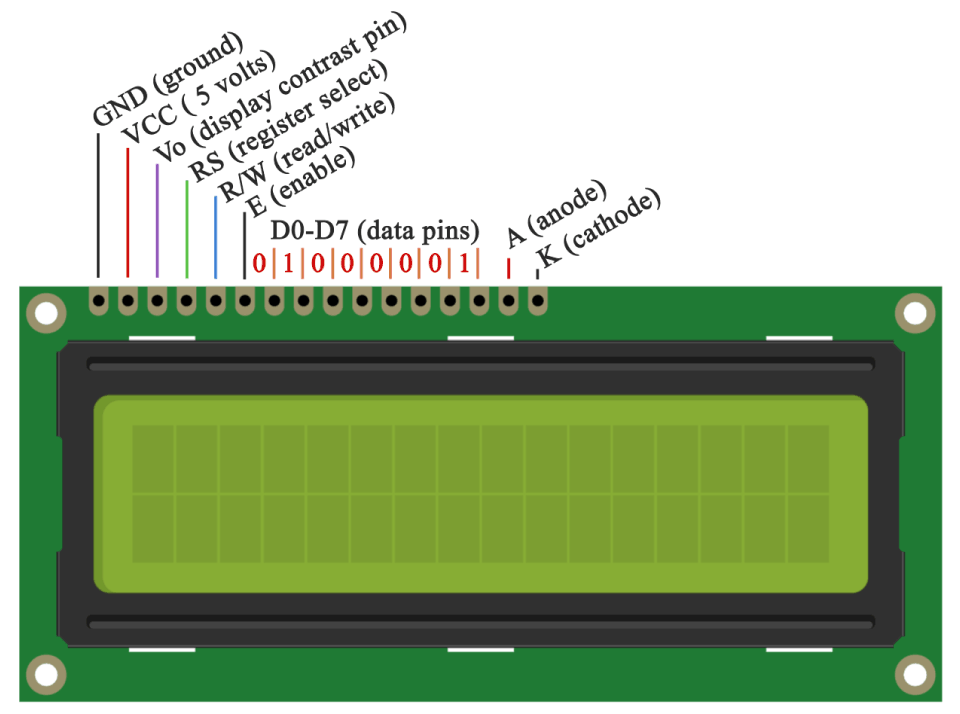
The LCD Pinout It has 16 pins and the first one from left to right is the Ground pin. The second pin is the VCC which we connect the 5 volts pin on the Arduino Board.
Next is the Vo pin on which we can attach a potentiometer for controlling the contrast of the display.
Next, The RS pin or register select pin is used for selecting whether we will send commands or data to the LCD.
For example if the RS pin is set on low state or zero volts, then we are sending commands to the LCD like: set the cursor to a specific location, clear the display, turn off the display and so on.
And when RS pin is set on High state or 5 volts we are sending data or characters to the LCD.
LCD Pin-Out Next comes the R / W pin which selects the mode whether we will read or write to the LCD. Here the write mode is obvious and it is used for writing or sending commands and data to the LCD. The read mode is used by the LCD itself when executing the program.
Next is the E pin which enables the writing to the registers, or the next 8 data pins from D0 to D7. So through this pins we are sending the 8 bits data when we are writing to the registers or for example if we want to see the latter uppercase A on the display we will send 0100 0001 i.e. 65 to the registers according to the ASCII table (char 'A' is 65 on ascii scale).
And the last two pins A and K, or anode and cathode are for the LED back light.
After all we don’t have to worry much about how the LCD works, as the Liquid Crystal Library takes care for almost everything.
From the Arduino’s official website you can find and see the functions of the library which enable easy use of the LCD. We can use the Library in 4 or 8 bit mode.
Program: LCD to print "Hello World"
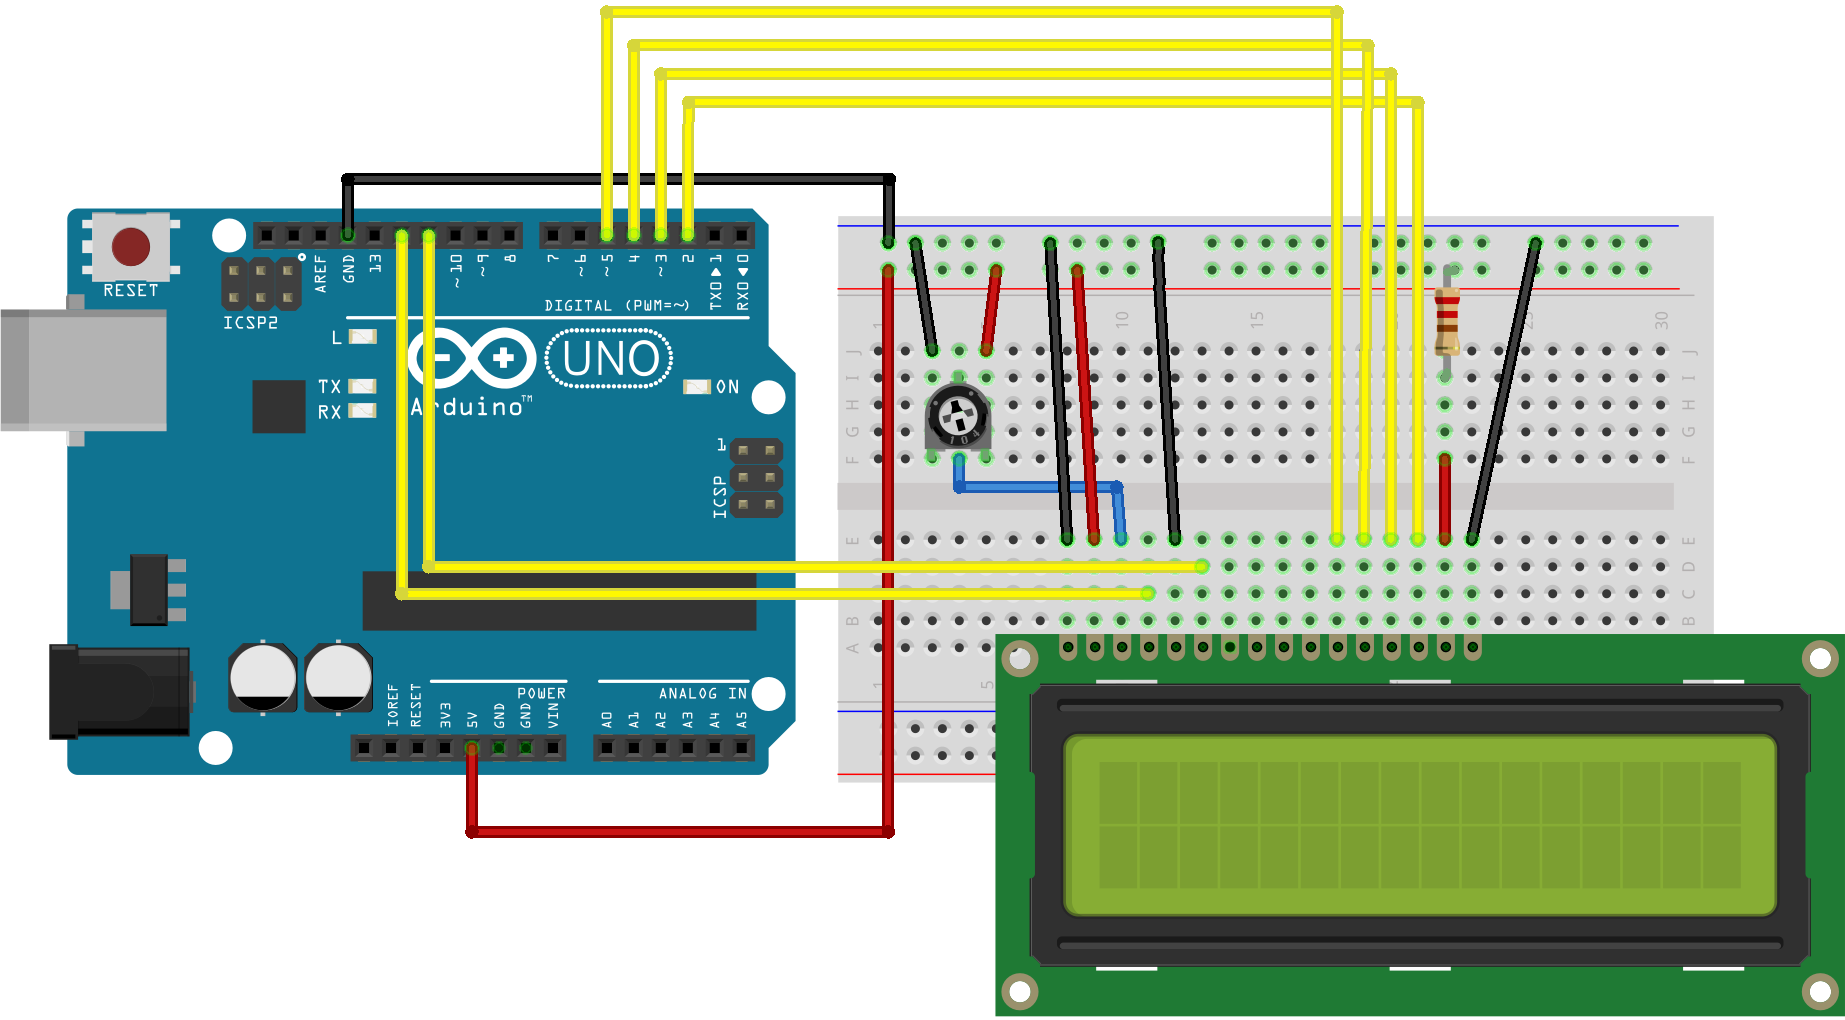
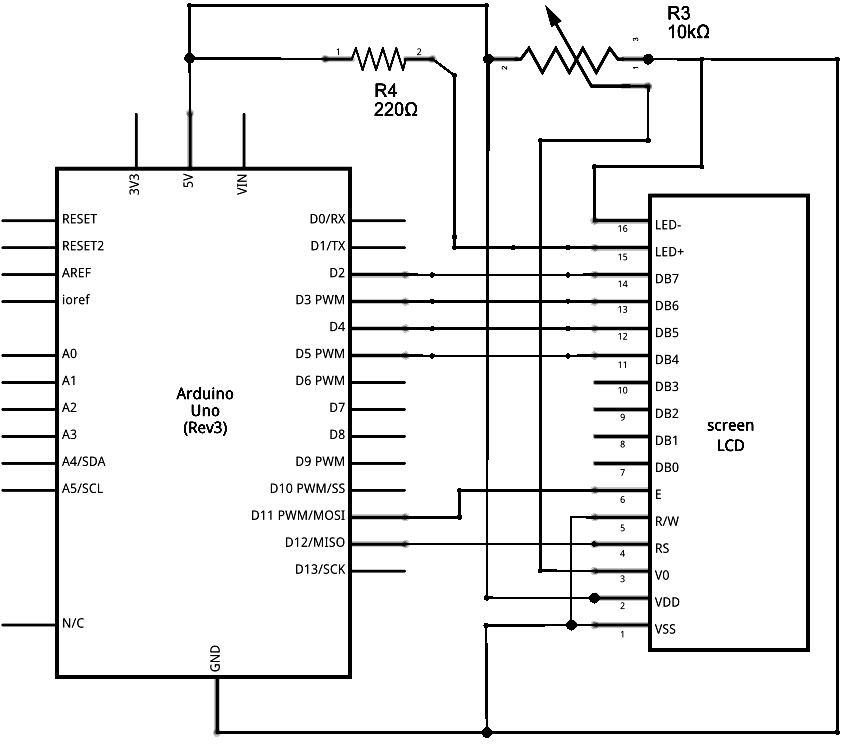
LCD Pin 1 is ground, LCD Pin 2 is for VCC.
LCD Pin 3 is V0 is to ground.
LCD RS pin to digital pin 12
LCD RW pin is to ground.
LCD Enable pin to digital pin 11
LCD D4 pin to digital pin 5
LCD D5 pin to digital pin 4
LCD D6 pin to digital pin 3
LCD D7 pin to digital pin 2
// include the library code:
#include <LiquidCrystal.h>

// initialize the library with the numbers of the interface pins
LiquidCrystal lcd(12, 11, 5, 4, 3, 2);

void setup() {
  // set up the LCD's number of columns and rows:
  lcd.begin(16, 2);
  // Print a message to the LCD.
  lcd.print("hello, world!");
}

void loop() {
  // set the cursor to column 0, line 1
  // (note: line 1 is the second row, since counting begins with 0):
  lcd.setCursor(0, 1);
  // print the number of seconds since reset:
  lcd.print(millis() / 1000);
}
Program: LCD to blink
LCD Pin 1 is ground, LCD Pin 2 is for VCC.
LCD Pin 3 is V0 is to ground.
LCD RS pin to digital pin 12
LCD RW pin is to ground.
LCD Enable pin to digital pin 11
LCD D4 pin to digital pin 5
LCD D5 pin to digital pin 4
LCD D6 pin to digital pin 3
LCD D7 pin to digital pin 2
// include the library code:
#include <LiquidCrystal.h>

const int rs = 12, en = 11, d4 = 5, d5 = 4, d6 = 3, d7 = 2;
LiquidCrystal lcd(rs, en, d4, d5, d6, d7);

void setup() {
  // set up the LCD's number of columns and rows:
  lcd.begin(16, 2);
  // Print a message to the LCD.
  lcd.print("hello, world!");
}

void loop() {
  // Turn off the blinking cursor:
  lcd.noBlink();
  delay(3000);
  // Turn on the blinking cursor:
  lcd.blink();
  delay(3000);
}
Program: LCD to set cursor on and off
LCD Pin 1 is ground, LCD Pin 2 is for VCC.
LCD Pin 3 is V0 is to ground.
LCD RS pin to digital pin 12
LCD RW pin is to ground.
LCD Enable pin to digital pin 11
LCD D4 pin to digital pin 5
LCD D5 pin to digital pin 4
LCD D6 pin to digital pin 3
LCD D7 pin to digital pin 2
// include the library code:
#include <LiquidCrystal.h>

const int rs = 12, en = 11, d4 = 5, d5 = 4, d6 = 3, d7 = 2;
LiquidCrystal lcd(rs, en, d4, d5, d6, d7);

void setup() {
  // set up the LCD's number of columns and rows:
  lcd.begin(16, 2);
  // Print a message to the LCD.
  lcd.print("hello, world!");
}

void loop() {
  // Turn off the blinking cursor:
  lcd.noBlink();
  delay(3000);
  // Turn on the blinking cursor:
  lcd.blink();
  delay(3000);
}