Raspberry Pi
The Raspberry Pi is a low cost, credit-card sized computer that plugs into a computer monitor or TV, and uses a standard keyboard and mouse.
It is a capable little device that enables people of all ages to explore computing, and to learn how to program in languages like Python
Several generations of Raspberry Pis have been released.
All models feature a Broadcom system on a chip (SoC) with an integrated ARM-compatible central processing unit (CPU) and on-chip graphics processing unit (GPU).
Raspberry Pi 3 Model B was released in February 2016 with a 1.2 GHz 64-bit quad core processor, on-board 802.11n Wi-Fi, Bluetooth and USB boot capabilities
Raspberry Pi - Installation
Installation requires three steps:
Setting up the Raspbian operating systems.
Enabling SSH
Using VNC viewer to get display
Raspberry Pi - Setting up the Raspbian operating systems.
You need a 8GB SD card. The contents will have to emptied for installation of Raspbian OS.
You need SD card and an adapter as shown below:
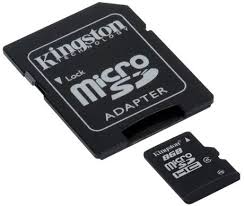
The SD card should be inserted into the adapter. Then the adapter can be put into a laptop or PC which has the card reader slot.
Using SD card formatter you must format the card.
Alternatively, NOOBS is available for download on the Raspberry Pi website: NOOBS
Once you've downloaded the NOOBS zip file, you'll need to copy the contents to a formatted SD card on your computer.
Download and extract the files from the NOOBS zip file.
Copy the extracted files onto the SD card that you just formatted, so that this file is at the root directory of the SD card.
In some cases it may extract the files into a folder; if this is the case, then please copy across the files from inside the folder rather than the folder itself
If you are a Windows user, we recommend formatting your SD card using the SD Association's Formatting Tool, which can be downloaded from SD Card formatter Instructions for using the tool are available on the same site.
With these steps the Raspbian OS is ready and we can use the raspberry pi.
Raspberry Pi - Enabling SSH
Create a file named SSH into the SD card where you have pasted the contents of NOOBS.zip
Note: the file should be without any extension.
This will enable SSH
Raspberry Pi
Now connect SD card to the raspberry pi along with keyboard, mouse and monitor.

Hardware
A Raspberry Pi computer with an SD card or micro SD card
A monitor with a cable (and, if needed, an HDMI adaptor)
A USB keyboard and mouse
A power supply
Headphones or speakers (optional)
An ethernet cable (optional)
Software Raspbian, installed via NOOBS
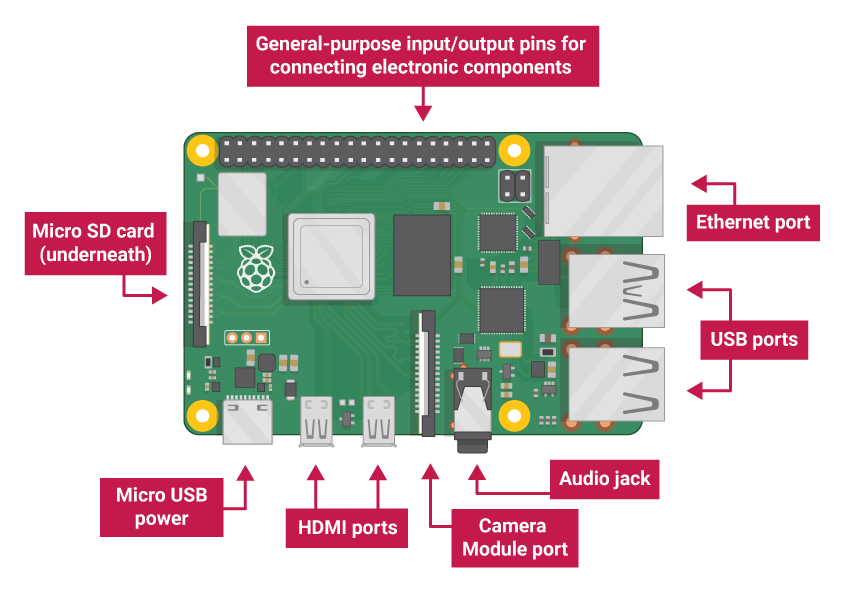
USB ports — these are used to connect a mouse and keyboard. You can also connect other components, such as a USB drive.
SD card slot — you can slot the SD card in here. This is where the operating system software and your files are stored.
Ethernet port — this is used to connect Raspberry Pi to a network with a cable. Raspberry Pi can also connect to a network via wireless LAN.
Audio jack — you can connect headphones or speakers here.
HDMI port — this is where you connect the monitor (or projector) that you are using to display the output from the Raspberry Pi. If your monitor has speakers, you can also use them to hear sound.
Micro USB power connector — this is where you connect a power supply. You should always do this last, after you have connected all your other components.
GPIO ports — these allow you to connect electronic components such as LEDs and buttons to Raspberry Pi.
Plug the power supply into a socket and then connect it to your Raspberry Pi’s USB power port.
You should see a red light on your Raspberry Pi and raspberries on the monitor. Your Raspberry Pi then boots up into a graphical desktop.
Raspberry Pi - Without monitor (headless) installation
If additional monitor or keyboard and mouse are not available. Connect your raspberry pi to the laptop using ethernet cable.
Install, PUTTY, VNC Viewer and NMAP to your laptop.
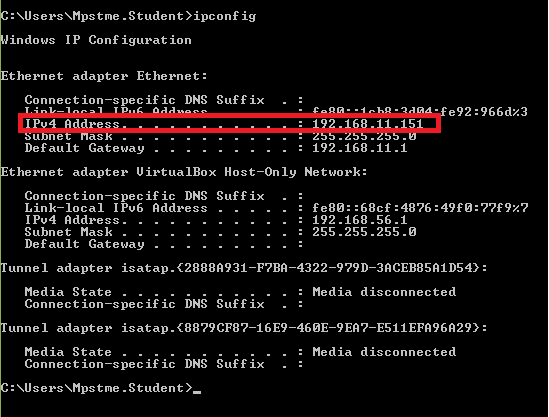
Open command prompt and type ipconfig
This is to find your ip address
If your ip address is 192.168.11.151. Then in the command prompt you will see below screen
Next type in the command prompt: nmap -sn 192.168.11.1/24.
Remember we changed the last part of the ip address from 151 to 1.
You will see a screen below.
Starting Nmap 6.40 ( http://nmap.org ) at 2014-03-10 12:46 GMT
Nmap scan report for raspberrypi (192.168.1.8)
Host is up (0.0030s latency).
Nmap done: 256 IP addresses (4 hosts up) scanned in 2.41 seconds
This ip address of your raspberry pi is 192.168.1.8.
Next open Putty. You will see below screen, enter the address of raspberry pi and enter
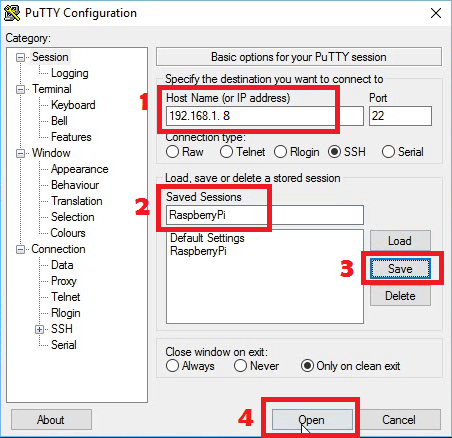
Once the connection is established, you will see the command prompt of raspberry pi
Raspberry Pi - Enabling VNC Server
On your Raspberry Pi command prompt, run the following commands to make sure you have the latest version of VNC Connect:
sudo apt update
sudo apt install realvnc-vnc-server realvnc-vnc-viewer
Now enable VNC Server. You can do this graphically or at the command line.
Enabling VNC Server graphically On your Raspberry Pi, boot into the graphical desktop.
Select Menu > Preferences > Raspberry Pi Configuration > Interfaces.
Ensure VNC is Enabled.
Enabling VNC Server at the command line
You can enable VNC Server at the command line using raspi-config:
sudo raspi-config
Now, enable VNC Server by doing the following:
Navigate to Interfacing Options.
Scroll down and select VNC > Yes.
Then go to your laptop and start vnc viewer , enter ip address of raspberry pi and click enter you will see the desktop of raspberry pi