Programming with GPIO
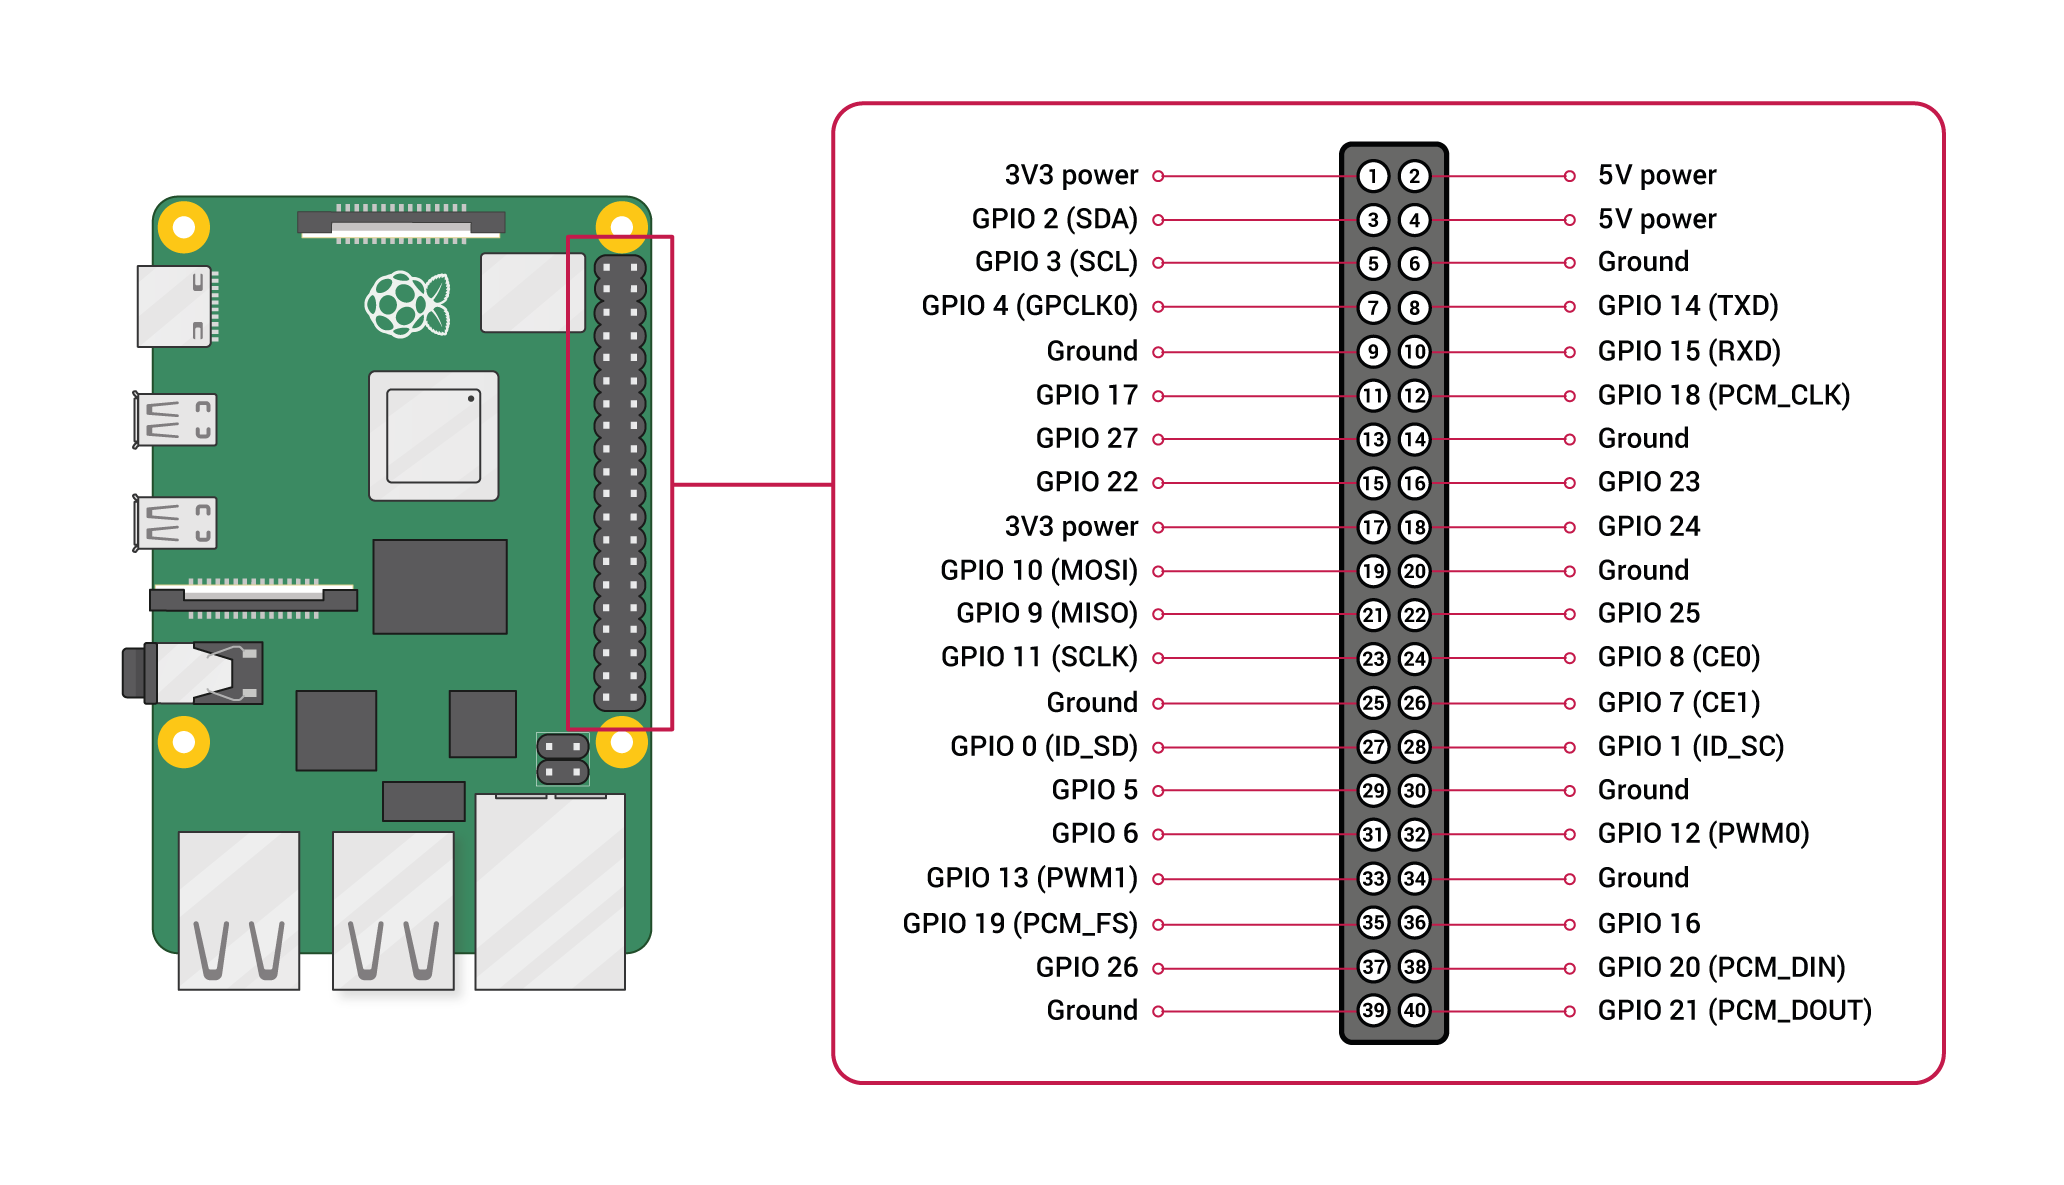
A powerful feature of the Raspberry Pi is the row of GPIO (general-purpose input/output) pins along the top edge of the board. A 40-pin GPIO header is found on all current Raspberry Pi boards.
Any of the GPIO pins can be designated (in software) as an input or output pin and used for a wide range of purposes.
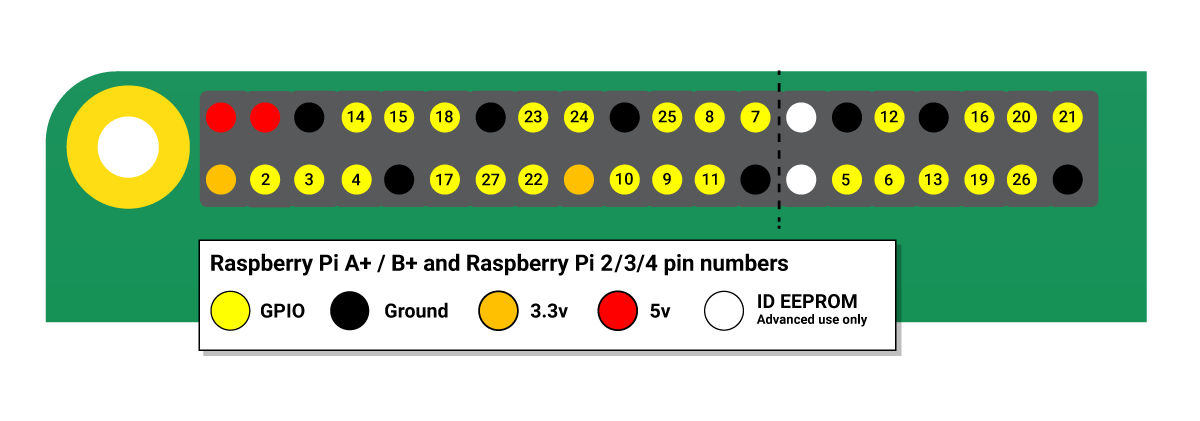
Note: the numbering of the GPIO pins is not in numerical order; GPIO pins 0 and 1 are present on the board (physical pins 27 and 28) but are reserved for advanced use
Voltages Two 5V pins and two 3V3 pins are present on the board, as well as a number of ground pins (0V), which are unconfigurable. The remaining pins are all general purpose 3V3 pins, meaning outputs are set to 3V3 and inputs are 3V3-tolerant.
Outputs A GPIO pin designated as an output pin can be set to high (3V3) or low (0V).
Inputs A GPIO pin designated as an input pin can be read as high (3V3) or low (0V).
This is made easier with the use of internal pull-up or pull-down resistors.
Pins GPIO2 and GPIO3 have fixed pull-up resistors, but for other pins this can be configured in software.
PWM (pulse-width modulation) Software PWM available on all pins
Serial TX (GPIO14); RX (GPIO15)
Programming with GPIO library
GPIO Zero is installed by default in the Raspbian desktop image, available from raspberrypi.org.
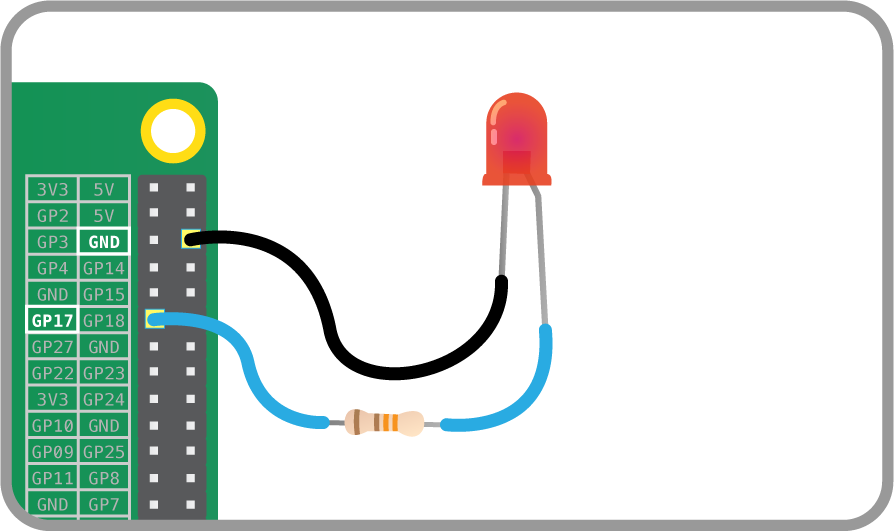
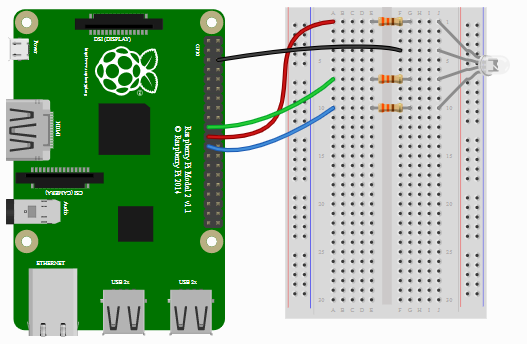
LED - To control an LED connected to GPIO17, you can use this code:
from gpiozero import LED
from time import sleep

led = LED(17)

while True:
    led.on()
    sleep(1)
    led.off()
    sleep(1)
Run this in an IDE like Thonny, and the LED will blink on and off repeatedly.
LED methods include on(), off(), toggle(), and blink().
LED - GPIO library
Turn an LED on and off repeatedly:
from gpiozero import LED
from signal import pause

red = LED(17)

red.blink()

pause()
Reaching the end of a Python script will terminate the process and GPIOs may be reset. Keep your script alive with pause().
LED with variable brightness - GPIO library
Any regular LED can have its brightness value set using PWM (pulse-width-modulation). In GPIO Zero, this can be achieved using PWMLED using values between 0 and 1:
from time import sleep

led = PWMLED(17)

while True:
    led.value = 0  # off
    sleep(1)
    led.value = 0.5  # half brightness
    sleep(1)
    led.value = 1  # full brightness
    sleep(1)
Alternate implementation.
from gpiozero import PWMLED
from signal import pause

led = PWMLED(17)

led.pulse()

pause()
Reaching the end of a Python script will terminate the process and GPIOs may be reset. Keep your script alive with pause().
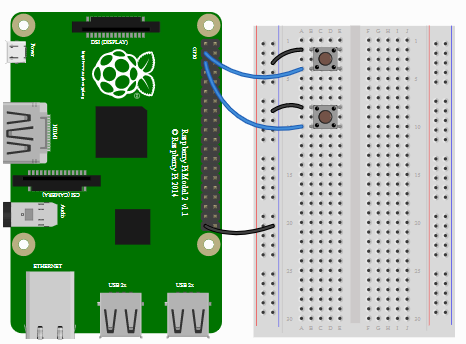
Button - GPIO library
Check if a Button is pressed:
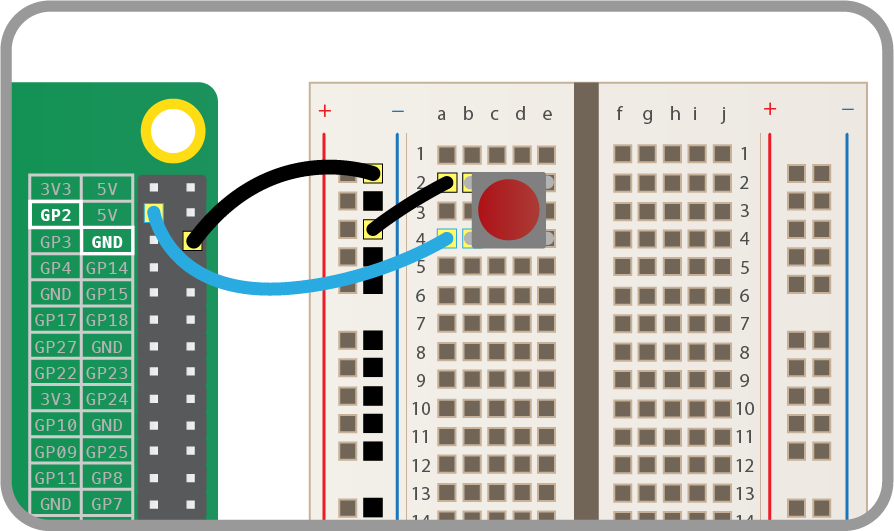
from gpiozero import Button

button = Button(2)

while True:
    if button.is_pressed:
        print("Button is pressed")
    else:
        print("Button is not pressed")
Wait for a button to be pressed before continuing:
from gpiozero import Button

button = Button(2)

button.wait_for_press()
print("Button was pressed")
Reaching the end of a Python script will terminate the process and GPIOs may be reset. Keep your script alive with pause().
Run a function every time the button is pressed:
from gpiozero import Button
from signal import pause

def say_hello():
    print("Hello!")

button = Button(2)

button.when_pressed = say_hello

pause()
Similarly, functions can be attached to button releases:
from gpiozero import Button
from signal import pause

def say_hello():
    print("Hello!")

def say_goodbye():
    print("Goodbye!")

button = Button(2)

button.when_pressed = say_hello
button.when_released = say_goodbye

pause()
Shutdown button - GPIO library
The Button class also provides the ability to run a function when the button has been held for a given length of time.
from gpiozero import Button
from subprocess import check_call
from signal import pause

def shutdown():
    check_call(['sudo', 'poweroff'])

shutdown_btn = Button(17, hold_time=2)
shutdown_btn.when_held = shutdown

pause()
Shutdown button - GPIO library
A collection of LEDs can be accessed using LEDBoard
from gpiozero import LEDBoard
from time import sleep
from signal import pause

leds = LEDBoard(5, 6, 13, 19, 26)

leds.on()
sleep(1)
leds.off()
sleep(1)
leds.value = (1, 0, 1, 0, 1)
sleep(1)
leds.blink()

pause()
Using LEDBoard with pwm=True allows each LED’s brightness to be controlled:
from gpiozero import LEDBoard
from signal import pause

leds = LEDBoard(5, 6, 13, 19, 26, pwm=True)

leds.value = (0.2, 0.4, 0.6, 0.8, 1.0)

pause()
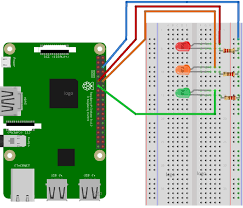
Traffic Lights - GPIO library
A full traffic lights system.
from gpiozero import TrafficLights
from time import sleep

lights = TrafficLights(2, 3, 4)

lights.green.on()

while True:
    sleep(10)
    lights.green.off()
    lights.amber.on()
    sleep(1)
    lights.amber.off()
    lights.red.on()
    sleep(10)
    lights.amber.on()
    sleep(1)
    lights.green.on()
    lights.amber.off()
    lights.red.off()
Alternatively:
from gpiozero import TrafficLights
from time import sleep
from signal import pause

lights = TrafficLights(2, 3, 4)

def traffic_light_sequence():
    while True:
        yield (0, 0, 1) # green
        sleep(10)
        yield (0, 1, 0) # amber
        sleep(1)
        yield (1, 0, 0) # red
        sleep(10)
        yield (1, 1, 0) # red+amber
        sleep(1)

lights.source = traffic_light_sequence()

pause()
Using LED components:
from gpiozero import LED
from time import sleep

red = LED(2)
amber = LED(3)
green = LED(4)

green.on()
amber.off()
red.off()

while True:
    sleep(10)
    green.off()
    amber.on()
    sleep(1)
    amber.off()
    red.on()
    sleep(10)
    amber.on()
    sleep(1)
    green.on()
    amber.off()
    red.off()
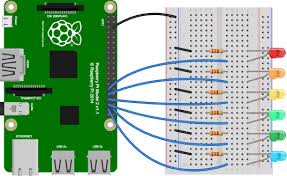
LED Bar Graph - GPIO library
A collection of LEDs can be treated like a bar graph using LEDBarGraph

from gpiozero import LEDBarGraph
from time import sleep

graph = LEDBarGraph(2, 3, 4, 5, 6)
graph.value = 2/5  # Light the first two LEDs only
sleep(1)
graph.value = -2/5 # Light the last two LEDs only
sleep(1)
graph.off()
LED Bar Graph with PWM - GPIO library
A collection of LEDs can be treated like a bar graph using LEDBarGraph but with PWM
As given below, the first line is 1/10 which is 0.5/5 (as only five LEDs are present) which means that first LED be set to 0.5 and rest all zero. The second line is 3/10 which gets converted to 1.5/5, which means set first LED to 1 and second to 0.5 while rest are zero. For the third statement, the process is reversed as negative sign is used.
from gpiozero import LEDBarGraph
from time import sleep
from __future__ import division  # required for python 2

graph = LEDBarGraph(5, 6, 13, 19, 26, pwm=True)

graph.value = 1/10  # (0.5, 0, 0, 0, 0)
sleep(1)
graph.value = 3/10  # (1, 0.5, 0, 0, 0)
sleep(1)
graph.value = -3/10  # (0, 0, 0, 0.5, 1)
sleep(1)
graph.value = 9/10  # (1, 1, 1, 1, 0.5)
sleep(1)
GPIO Music Box - GPIO library
Each button plays a different sound!
from gpiozero import Button
import pygame.mixer
from pygame.mixer import Sound
from signal import pause

pygame.mixer.init()

button_sounds = {
    Button(2): Sound("samples/drum_tom_mid_hard.wav"),
    Button(3): Sound("samples/drum_cymbal_open.wav"),
}

for button, sound in button_sounds.items():
    button.when_pressed = sound.play

pause()
All on when pressed - GPIO library
While the button is pressed down, the buzzer and all the lights come on.
from gpiozero import LED, Buzzer, Button
from signal import pause

button = Button(2)
buzzer = Buzzer(3)
red = LED(4)
amber = LED(5)
green = LED(6)

things = [red, amber, green, buzzer]

def things_on():
    for thing in things:
        thing.on()

def things_off():
    for thing in things:
        thing.off()

button.when_pressed = things_on
button.when_released = things_off

pause()
Full color RGB LED - GPIO library
Making colours with an RGBLED:
from gpiozero import RGBLED
from time import sleep
from __future__ import division  # required for python 2

led = RGBLED(red=9, green=10, blue=11)

led.red = 1  # full red
sleep(1)
led.red = 0.5  # half red
sleep(1)

led.color = (0, 1, 0)  # full green
sleep(1)
led.color = (1, 0, 1)  # magenta
sleep(1)
led.color = (1, 1, 0)  # yellow
sleep(1)
led.color = (0, 1, 1)  # cyan
sleep(1)
led.color = (1, 1, 1)  # white
sleep(1)

led.color = (0, 0, 0)  # off
sleep(1)

# slowly increase intensity of blue
for n in range(100):
    led.blue = n/100
    sleep(0.1)