Program 2: Read a switch, print the state out to the Arduino Serial Monitor
Step 1: Take a arduino uno board, breadboard, button, jumper wires (male to male) and printer wire (to connect arduino board to PC).
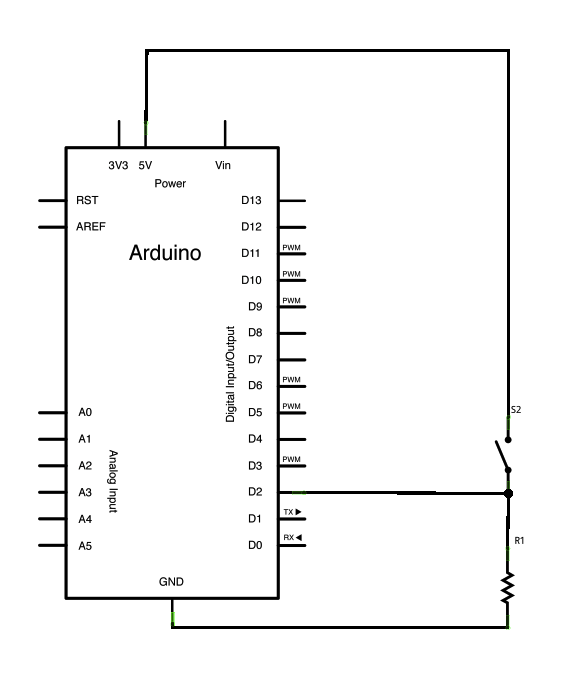
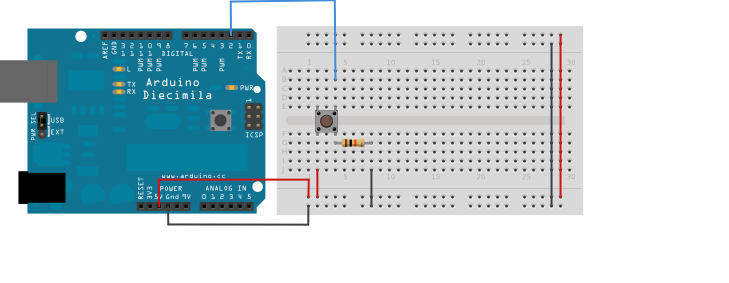
Step 2: Connect the circuit as shown in below figures.
Step 3: Write a program in Arduino uno desktop editor IDE. By opening new sketch.
Step 4: Save file, compile it and upload.
// digital pin 2 has a pushbutton attached to it. Give it a name:
int pushButton = 2;

// the setup routine runs once when you press reset:
void setup() {
  // initialize serial communication at 9600 bits per second:
  Serial.begin(9600);
  // make the pushbutton's pin an input:
  pinMode(pushButton, INPUT);
}

// the loop routine runs over and over again forever:
void loop() {
  // read the input pin:
  int buttonState = digitalRead(pushButton);
  // print out the state of the button:
  Serial.println(buttonState);
  delay(1000);        // delay in between reads for stability
}
Explanation of code
In setup(), we provide the speed of serial communication. Then using pinMode() we initialize port 2 i.e. digital port of arduino uno , to obtain input from the button.
The button when released sends a 0V current to port 2 . Since port 2 is digital it receives it as 0. The buttonState variable is set to 0 and displayed on the serial monitor.
Similarly when the button is pressed, the current of 5V is given to port 2, which receives it as 1. The buttonState variable is set to 1 and displayed on the serial monitor.
The buttonState is monitored every 1000ms and hence the delay() is used.
Program 3: Demonstrates the use of analogWrite() to fade an LED
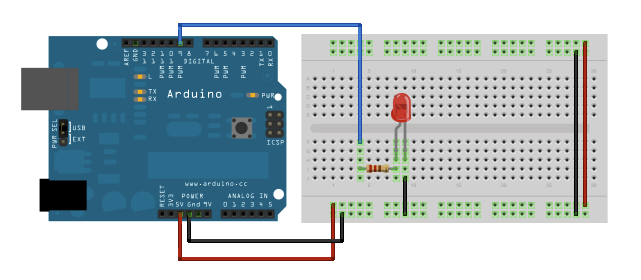
Step 1: Requirements are arduino uno, breadboard, jumper wires, register, LED and arduino desktop IDE. Connections should be made as shown below.
Step 2: Write a program in Arduino uno desktop editor IDE. By opening new sketch.
Step 3: Save file, compile it and upload.

int led = 9;           // the PWM pin the LED is attached to
int brightness = 0;    // how bright the LED is
int fadeAmount = 5;    // how many points to fade the LED by

// the setup routine runs once when you press reset:
void setup() {
  // declare pin 9 to be an output:
  pinMode(led, OUTPUT);
}

// the loop routine runs over and over again forever:
void loop() {
  // set the brightness of pin 9:
  analogWrite(led, brightness);

  // change the brightness for next time through the loop:
  brightness = brightness + fadeAmount;

  // reverse the direction of the fading at the ends of the fade:
  if (brightness <= 0 || brightness >= 255) {
    fadeAmount = -fadeAmount;
  }
  // wait for 30 milliseconds to see the dimming effect
  delay(30);
}