EEPROM - Electronically Erasable Programmable Read-Only Memory
The microcontroller on the Arduino and Genuino AVR based board has EEPROM: memory whose values are kept when the board is turned off (like a tiny hard drive).
A disk is non-volatile memory, like flash which is also a non-volatile memory
You can write something, you lose power. When you turn on power again, it still has the same memory. So in fact, EEPROM technology is similar to flash.
But it's more flexible as you can write a single byte at a time. Now with flash, you can't actually write a byte at a time. Memory is grouped into blocks.
So if you want to write to one byte, you've gotta write to the whole block. Which maybe you don't even need to write to the whole block.
So this wastes time and things like this but that's the way it's organized. EEPROM's more flexible. It's byte writable so you can do one byte at a time.
And EEPROM supports many more write cycles than flash so even though both don't last forever. Flash will last tens of thousands of write cycles. So, what that means is if you've got Flash, and you've got a particular address in the Flash, you write to that address 10,000 times. After that eventually that address won't work anymore.
And, the memory will just fail. So the flashes have a limited lifetime. And EEPROM is better than flash. So maybe a flash might be tens of thousands of write cycles, EEPROM would be a hundred thousand
Now this isn't as good as hard disk, disk has a lot more than that. But EEPROM is better than flash.
Flash on our ATMega is used for the program or sketch itself. So the code itself is sitting on the Flash, plus the boot-loader.
But the EEPROM is a place where you might store settings, or variables, or something like that, that you want to save time and time again. Even after you unplug your Arduino, plug it back in.
They provide library functions to access the EEPROM you access one address at a time. And each address is one byte, so we call byte addressable, meaning every address has one byte in it.
So the way you read an address is you call this function called EEPROM.read. It's in the EEPROM library. It's called read. And you pass it an argument, which is an address, which is just a number. And that number, that function returns the contents of that address, so all the addresses are numbered.
Since there are only 1024 locations in the memory, there are 1024 addresses, they're numbered 0 through 1023.
So that address argument can be any value from 0 to 1023, and EEPROM.read will return the contents of that address, the byte. It'll return a one byte value.
EEPROM.write takes two arguments, an address and some data some byte size piece of data. So that data's one byte, and a write set byte into that address.
And the address has to be between zero and 1023 because that's as big as the EEPROM is.
This library enables you to read and write those bytes.
The supported micro-controllers on the various Arduino and Genuino boards have different amounts of EEPROM: 1024 bytes on the ATmega328P, 512 bytes on the ATmega168 and ATmega8, 4 KB (4096 bytes) on the ATmega1280 and ATmega2560.
The Arduino and Genuino 101 boards have an emulated EEPROM space of 1024 bytes.
To use this library
#include <EEPROM.h>
Examples
EEPROM Clear: Clear the bytes in the EEPROM.
EEPROM Read: Read the EEPROM and send its values to the computer.
EEPROM Write: Stores values from an analog input to the EEPROM.
EEPROM Crc: Calculates the CRC of EEPROM contents as if it was an array.
EEPROM Get: Get values from EEPROM and prints as float on serial.
EEPROM Iteration: Understand how to go through the EEPROM memory locations.
EEPROM Put: Put values in EEPROM using variable semantics.
EEPROM Update: Stores values read from A0 into EEPROM, writing the value only if different, to increase EEPROM life.
/*
 * EEPROM Clear
 *
 * Sets all of the bytes of the EEPROM to 0.
 * This example code is in the public domain.
 */

#include <EEPROM.h>

void setup() {
  // initialize the LED pin as an output.
  pinMode(13, OUTPUT);

  /***
    Iterate through each byte of the EEPROM storage.

    Larger AVR processors have larger EEPROM sizes, E.g:
    - Arduno Duemilanove: 512b EEPROM storage.
    - Arduino Uno:        1kb EEPROM storage.
    - Arduino Mega:       4kb EEPROM storage.

    Rather than hard-coding the length, you should use the pre-provided length function.
    This will make your code portable to all AVR processors.
  ***/

  for (int i = 0 ; i < EEPROM.length() ; i++) {
    EEPROM.write(i, 0);
  }

  // turn the LED on when we're done
  digitalWrite(13, HIGH);
}

void loop() {
  /** Empty loop. **/
}
EEPROM - read()
Reads a byte from the EEPROM. Locations that have never been written to have the value of 255.
#include <EEPROM.h>

int a = 0;
int value;

void setup()
{
  Serial.begin(9600);
}

void loop()
{
  value = EEPROM.read(a);

  Serial.print(a);
  Serial.print("\t");
  Serial.print(value);
  Serial.println();

  a = a + 1;

  if (a == 512)
    a = 0;

  delay(500);
}
EEPROM - write()
Write a byte to the EEPROM.
Syntax EEPROM.write(address, value)
Parameters address: the location to write to, starting from 0 (int) value: the value to write, from 0 to 255 (byte)
Returns: none
Note An EEPROM write takes 3.3 ms to complete. The EEPROM memory has a specified life of 100,000 write/erase cycles, so you may need to be careful about how often you write to it.
#include <EEPROM.h>

void setup()
{
  for (int i = 0; i < 255; i++)
    EEPROM.write(i, i);
}

void loop()
{
}
EEPROM - update()
Write a byte to the EEPROM. The value is written only if differs from the one already saved at the same address.
Syntax EEPROM.update(address, value)
Parameters address: the location to write to, starting from 0 (int) value: the value to write, from 0 to 255 (byte)
Returns none
Note An EEPROM write takes 3.3 ms to complete. The EEPROM memory has a specified life of 100,000 write/erase cycles, so using this function instead of write() can save cycles if the written data does not change often
#include <EEPROM.h>

void setup()
{
  for (int i = 0; i < 255; i++) {
    // this performs as EEPROM.write(i, i)
    EEPROM.update(i, i);
  }
  for (int i = 0; i < 255; i++) {
    // write value "12" to cell 3 only the first time
    // will not write the cell the remaining 254 times
    EEPROM.update(3, 12);
  }
}

void loop()
{
}
EEPROM - put()
Write any data type or object to the EEPROM.
Syntax EEPROM.put(address, data)
Parameters 1- address: the location to write to, starting from 0 (int) 2- data: the data to write, can be a primitive type (eg. float) or a custom struct
Returns A reference to the data passed in
Note This function uses EEPROM.update() to perform the write, so does not rewrites the value if it didn't change.
#include <EEPROM.h>

struct MyObject {
  float field1;
  byte field2;
  char name[10];
};

void setup() {

  Serial.begin(9600);
  while (!Serial) {
    ; // wait for serial port to connect. Needed for native USB port only
  }

  float f = 123.456f;  //Variable to store in EEPROM.
  int eeAddress = 0;   //Location we want the data to be put.


  //One simple call, with the address first and the object second.
  EEPROM.put(eeAddress, f);

  Serial.println("Written float data type!");

  /** Put is designed for use with custom structures also. **/

  //Data to store.
  MyObject customVar = {
    3.14f,
    65,
    "Working!"
  };

  eeAddress += sizeof(float); //Move address to the next byte after float 'f'.

  EEPROM.put(eeAddress, customVar);
  Serial.print("Written custom data type! \n\nView the example sketch eeprom_get to see how you can retrieve the values!");
}

void loop() {   /* Empty loop */ }
EEPROM - get()
Description Read any data type or object from the EEPROM.
Syntax EEPROM.get(address, data)
Parameters 1- address: the location to read from, starting from 0 (int) 2- data: the data to read, can be a primitive type (eg. float) or a custom struct
Returns A reference to the data passed in
#include <EEPROM.h>

struct MyObject{
  float field1;
  byte field2;
  char name[10];
};

void setup(){

  float f = 0.00f;   //Variable to store data read from EEPROM.
  int eeAddress = 0; //EEPROM address to start reading from

  Serial.begin( 9600 );
  while (!Serial) {
    ; // wait for serial port to connect. Needed for Leonardo only
  }
  Serial.print( "Read float from EEPROM: " );

  //Get the float data from the EEPROM at position 'eeAddress'
  EEPROM.get( eeAddress, f );
  Serial.println( f, 3 );  //This may print 'ovf, nan' if the data inside the EEPROM is not a valid float.

  // get() can be used with custom structures too.
  eeAddress = sizeof(float); //Move address to the next byte after float 'f'.
  MyObject customVar; //Variable to store custom object read from EEPROM.
  EEPROM.get( eeAddress, customVar );

  Serial.println( "Read custom object from EEPROM: " );
  Serial.println( customVar.field1 );
  Serial.println( customVar.field2 );
  Serial.println( customVar.name );
}

void loop(){ /* Empty loop */ }
EEPROM - Masking
Use of masking is to focus on a certain subset of the bits in a big number and eliminate the rest of the bits. Eliminate means to set them all to zeros, so that they are not affecting any computations
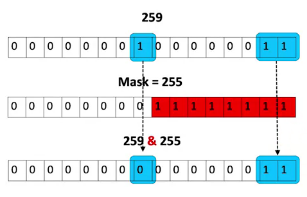
For example, given in below image the decimal number, 259. Top row represents 259 in binary
However, even if the number is 16 bit but the arduino uno is a 8 bit microcontroller and it can handle only 8 bit arithmetic as its adder, multiplier etc. are 8 bit
So you might have to add the low bits, then add the high bits. This is where the masking is useful.
For this purpose we use a mask as given in the middle row it has 8 zeros and 8 ones, the low byte are all ones.
When such a mask is used on the original number we perform bitwise AND operation on it. Bitwise AND is a basic AND operation. If you AND anything with 0 you get 0 and AND anything with 1 you get same number.
So if mask is applied in the result all the high bits are zeros. So we masked out all the high bits. For the low bits, if you look at the results at the bottom, the low 8 bits are the same as the low 8 bits of 259. But the high bits are all zeros, that's what the masking did.
So we used a mask, we did a bitwise AND with the original number, and now all we have left are the low bits. The bits that were highlighted by the masks. The bits where the masked value was one. The bits where the masked value was zero, they were all zeroed out.
That is the point of masking, to focus on a subset of the bits, whichever bits you're interested in, in this case the low bits.
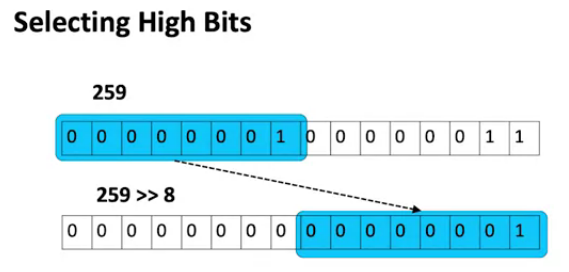
Now what if you want to look at high bits as the original number you can use a right shift operation (>>). 259 >> 8 will shift all the high bits are shifted to 8 positions. The shift operation replaces the shifted bits by zero.
So now we have the situation we wanted, where the high bits that we were interested in, they are now present in the result in the low bits, but the high bits of the result are all zeroed out
So here's a little example of how you might write an integer to an EEPROM, you do it one byte at a time
int bigData;
byte littleData;

void setup()
{
littleData = bigData & 0xFF;
EEPROM.write(0,littleData);
littleData = (bigData >> 8);
EEPROM.write(1, littleData);
}
We create a variable littleData and use it to store result of masking the original number with 0xFF (a 16 bit mask with 8 high bits as 1 and 8 low bits as 0).
We use 0xFF for the mask which is hexadecimal notation because hex is compact as only need two characters to represent 8 ones
Then, if I want to look at the high bits, I can take the bigData and write shift it 8 to bring those high 8 down to low 8. And then I do a write again
And this time, I'm writing the high 8. And notice, I'm writing them to different directions. So the first write, I wrote to address 0, second write, I wrote to address 1. So I wrote the least significant byte to address 0, the most significant byte to address 1. And this is called Little Endian ordering
Wherewe take the least significant byte and put it in the lowest address.
Notice, we could have done it the other way, right. We could have take the least significant byte and put it in address 1 and put the most significant byte in address 0, if I wanted to.
That'd be called big endian ordering and we use little endian and it was a completely arbitrary choice.