Network and Raspberry Pi
Connecting your Raspberry pi to a network is easy because it's using a real operating system. It's using Linux.
Now one way is to use a wired connection that is using the built-in RJ45 connector. So you can use a wired Ethernet connection, plug it into a jack in your wall.
The more common way is to use a WiFi connection. And that's using the built-in WiFi adapter. It's built into the board, you don't have to do anything with this.
To connect to a network - power up the Raspberry Pi. Start WiFi config from the desktop. You can find an icon in the pull down menu, you could find it in the pull down menus or you could do it from a console window. Select WiFi config. It allows you to select a network and give a password. You've seen very similar interfaces on any, a Mac or a Windows, and any Linux machines you ever use, it's the same thing.
You get this pop-up, you click scan, it'll show you a list of all the networks that you can receive. You click one, you type in a password if it's secured and that'll be that. It's very simple to connect to WiFi network, to any network, to a wired or WiFi network. You just do it like this.
Now once you connect in that way, just like you would with your laptop. And DHCP is going to be used to get an IP address. DHCP is just a protocol to give an IP Address. So everything on that network has to have some unique IP Address. And before you've connected your device to the network, it doesn't have an IP Address. You power it on, it gets one, dynamically, that's what DHCP is for.
But that's all built-in, there's nothing for you to do for that. You don't have to worry about the protocol or anything like that. Now then you're probably going to want to use a web browser. There's a pre-installed one, Chromium. Just click on its icon and they will appear and you'll be using a web browser just like any other machine, it's pretty simple.
Now one thing to warn you about is firewall. It depends on a network you're using. Firewalled network, whenever we set up a new computer, by defaults lots of ports are blocked off, or firewalled. So what happens is there are these ports, 16,000 ports roughly, and almost all of them are blocked off.
Secure Shell and Raspberry Pi
Secure Shell ssh short hand is the program that allows you to access the machine remotely.
So a shell is such a program that accepts your commands and interprets your commands. So for instance if you type into the shell, it's what you see at a console.
If you type into the shell - ls, then it'll interpret that, and ls means directory, so it'll give you a directory listing in Linux.
If you type cd that'll change directory, and so on. So a shell is just a basic program where you type into it, it interprets a command, it executes a command and it prints out the results to you.
So that's all a shell is, and that shell is what LXTerminal does for you. LXTerminal runs a shell in Raspbian, in Raspberry Pi.
A secure shell is basically a way to get a remote shell.
So Say you've got your Raspberry Pi in your house and want to connect to your Raspberry Pi at your house.
I can use secure shell to connect to my computer on my desk in my office. And so I can to my Raspberry Pi and that will send that command to my machine at my desk and the directory on the machine at my desk will appear on my screen. So we're going to use secure shell for that.
Now, just for a little background, secure shell, it's predecessor is a program called Telnet. Telnet, it's the same thing, it's a remote shell but it's not secure. So it doesn't encrypt the traffic in transit. So don't use telnet unless you do not care if the world sees what you're typing
One really good thing about using a Secure Shell with a Raspberry Pi is that Raspberry Pi you'll notice when you get it out of the box. It doesn't have a screen, it doesn't have a keyboard, mouse, any of that. So, you need to connect a screen to it, connect a keyboard, connect a mouse. But if you use Secure Shell, you don't have to do that.
You can just connect your Raspberry Pi up to the network, wi-fi, say. Then you can go to your laptop and connect to the Raspberry Pi, and type into your laptop and it will send it straight to Raspberry Pi and you can see the results.
So you can use your Raspberry Pi without connecting up a physical keyboard, and mouse, and screen, if you use Secure Shell to remotely connect to it. Another thing that is really useful to do with a Raspberry Pi.
Whenever you do Secure Shell, there are two machines involved, and this is generally how the Internet works. You have this client-server model. So, on the one side, you've got the Secure Shell server, and the Secure Shell server is a program that's running on the machine that you want to access remotely.
So if I want to If I'm on my laptop, I want to access the Raspberry Pi. I would have to run a secure shell server on the Raspberry Pi. Then the secure shell client, that's a program that's running on the machine that I'm using to access the server.
So, in the case where, from my laptop, I want to talk to my Raspberry Pi, but I want to sit at my laptop, the laptop is running Secure Shell client.
Basically the whole Secure Shell protocol is two programs talking to each other across the network. So the command you type into the client will be sent to the server and executed on the server. And then the response is the results, whatever text appears on the screen, that is sent back to the client and appears on the client's screen.
Now a basic secure shell, which is what we'll be dealing with, involves only a terminal interface, basically a text base interface. So it will look just like LX terminal on the Raspberry Pi. You get text. No graphics, no GUI.
In order to run Secure Shell, both machines have to be on the internet. They both have to be connected to the internet somehow, both have addresses on the internet. You must have a secure shell client program running on the client machine.
If you install the Linux application, or Linux operating system on your machine, or Mac OS X, which is essentially a nice looking Linux. Either one of those two will have secure shell clients built in, right, by default.
But if you're running instead, if you're running like on a Windows machine, then you will have to download a Secure Shell client of some kind like putty
Next requirement, the machine being controlled has to be running a Secure Shell server. Not only does it have to a Secure Shell server program installed, that has to be executed. It has to be executing when you want to do the connection. So this is actually default on the Raspberry Pi, on Raspbian, specifically. When you start Raspbian, it has a secure shell server.
Daemon is what they're called in Unix that's running by default.
So as soon as you boot your Raspberry Pi, in the background one of your background processes is a Secure Shell server that's just sitting there running waiting for connections
Another thing is that on the server machine, the machine that you're connecting to you have to have an account
The server's going to ask you for a username and a password. So you have to have a valid account credentials, valid username password on the server machine or else this whole mechanism won't work. Because the whole point of Secure Shell is to verify the credentials
To check that you really are entitled to connect to this machine and send this data, receive this data.
Any firewall needs to allow Secure Shell access. If there is a firewall then it has to be opened to up allow to allow Secure Shell access, which by default, that firewall port is shutdown and I have to ask the administrator to turn that on. But it's a public network, it shouldn't be a problem.
Secure Shell client and server
If you want to connect to another machine with SSH, secure shell, you've got to run the client. Now right now, for this, I'm going to assume we're using a Linux machine to run the client on.
You're running on Windows, then probably depending on which secure shell you're using, say you're using putty
If you run that, then it's a little bit difference because to start running the program you double-click on the program. It opens up a little window, and then you type in the same information, user name, domain name, all that. But it just looks different, depending.
You type in the following command, SSH which is the name of program. Then you give a username, and then at and then the domain name. So the username is your username on the server machine.
Whatever your username is on the server you put that there. That's the left of the at sign. To the right of the at sign you give the domain name. That's the mnemonic, the address for whatever the server machine's name is.
So for instance, that might be uci.edu. If that's what I want to connect to. So note that you have to have a domain name, and we'll talk about that in a little bit. But you have to have a domain name, or some alternative, or just an IP address.
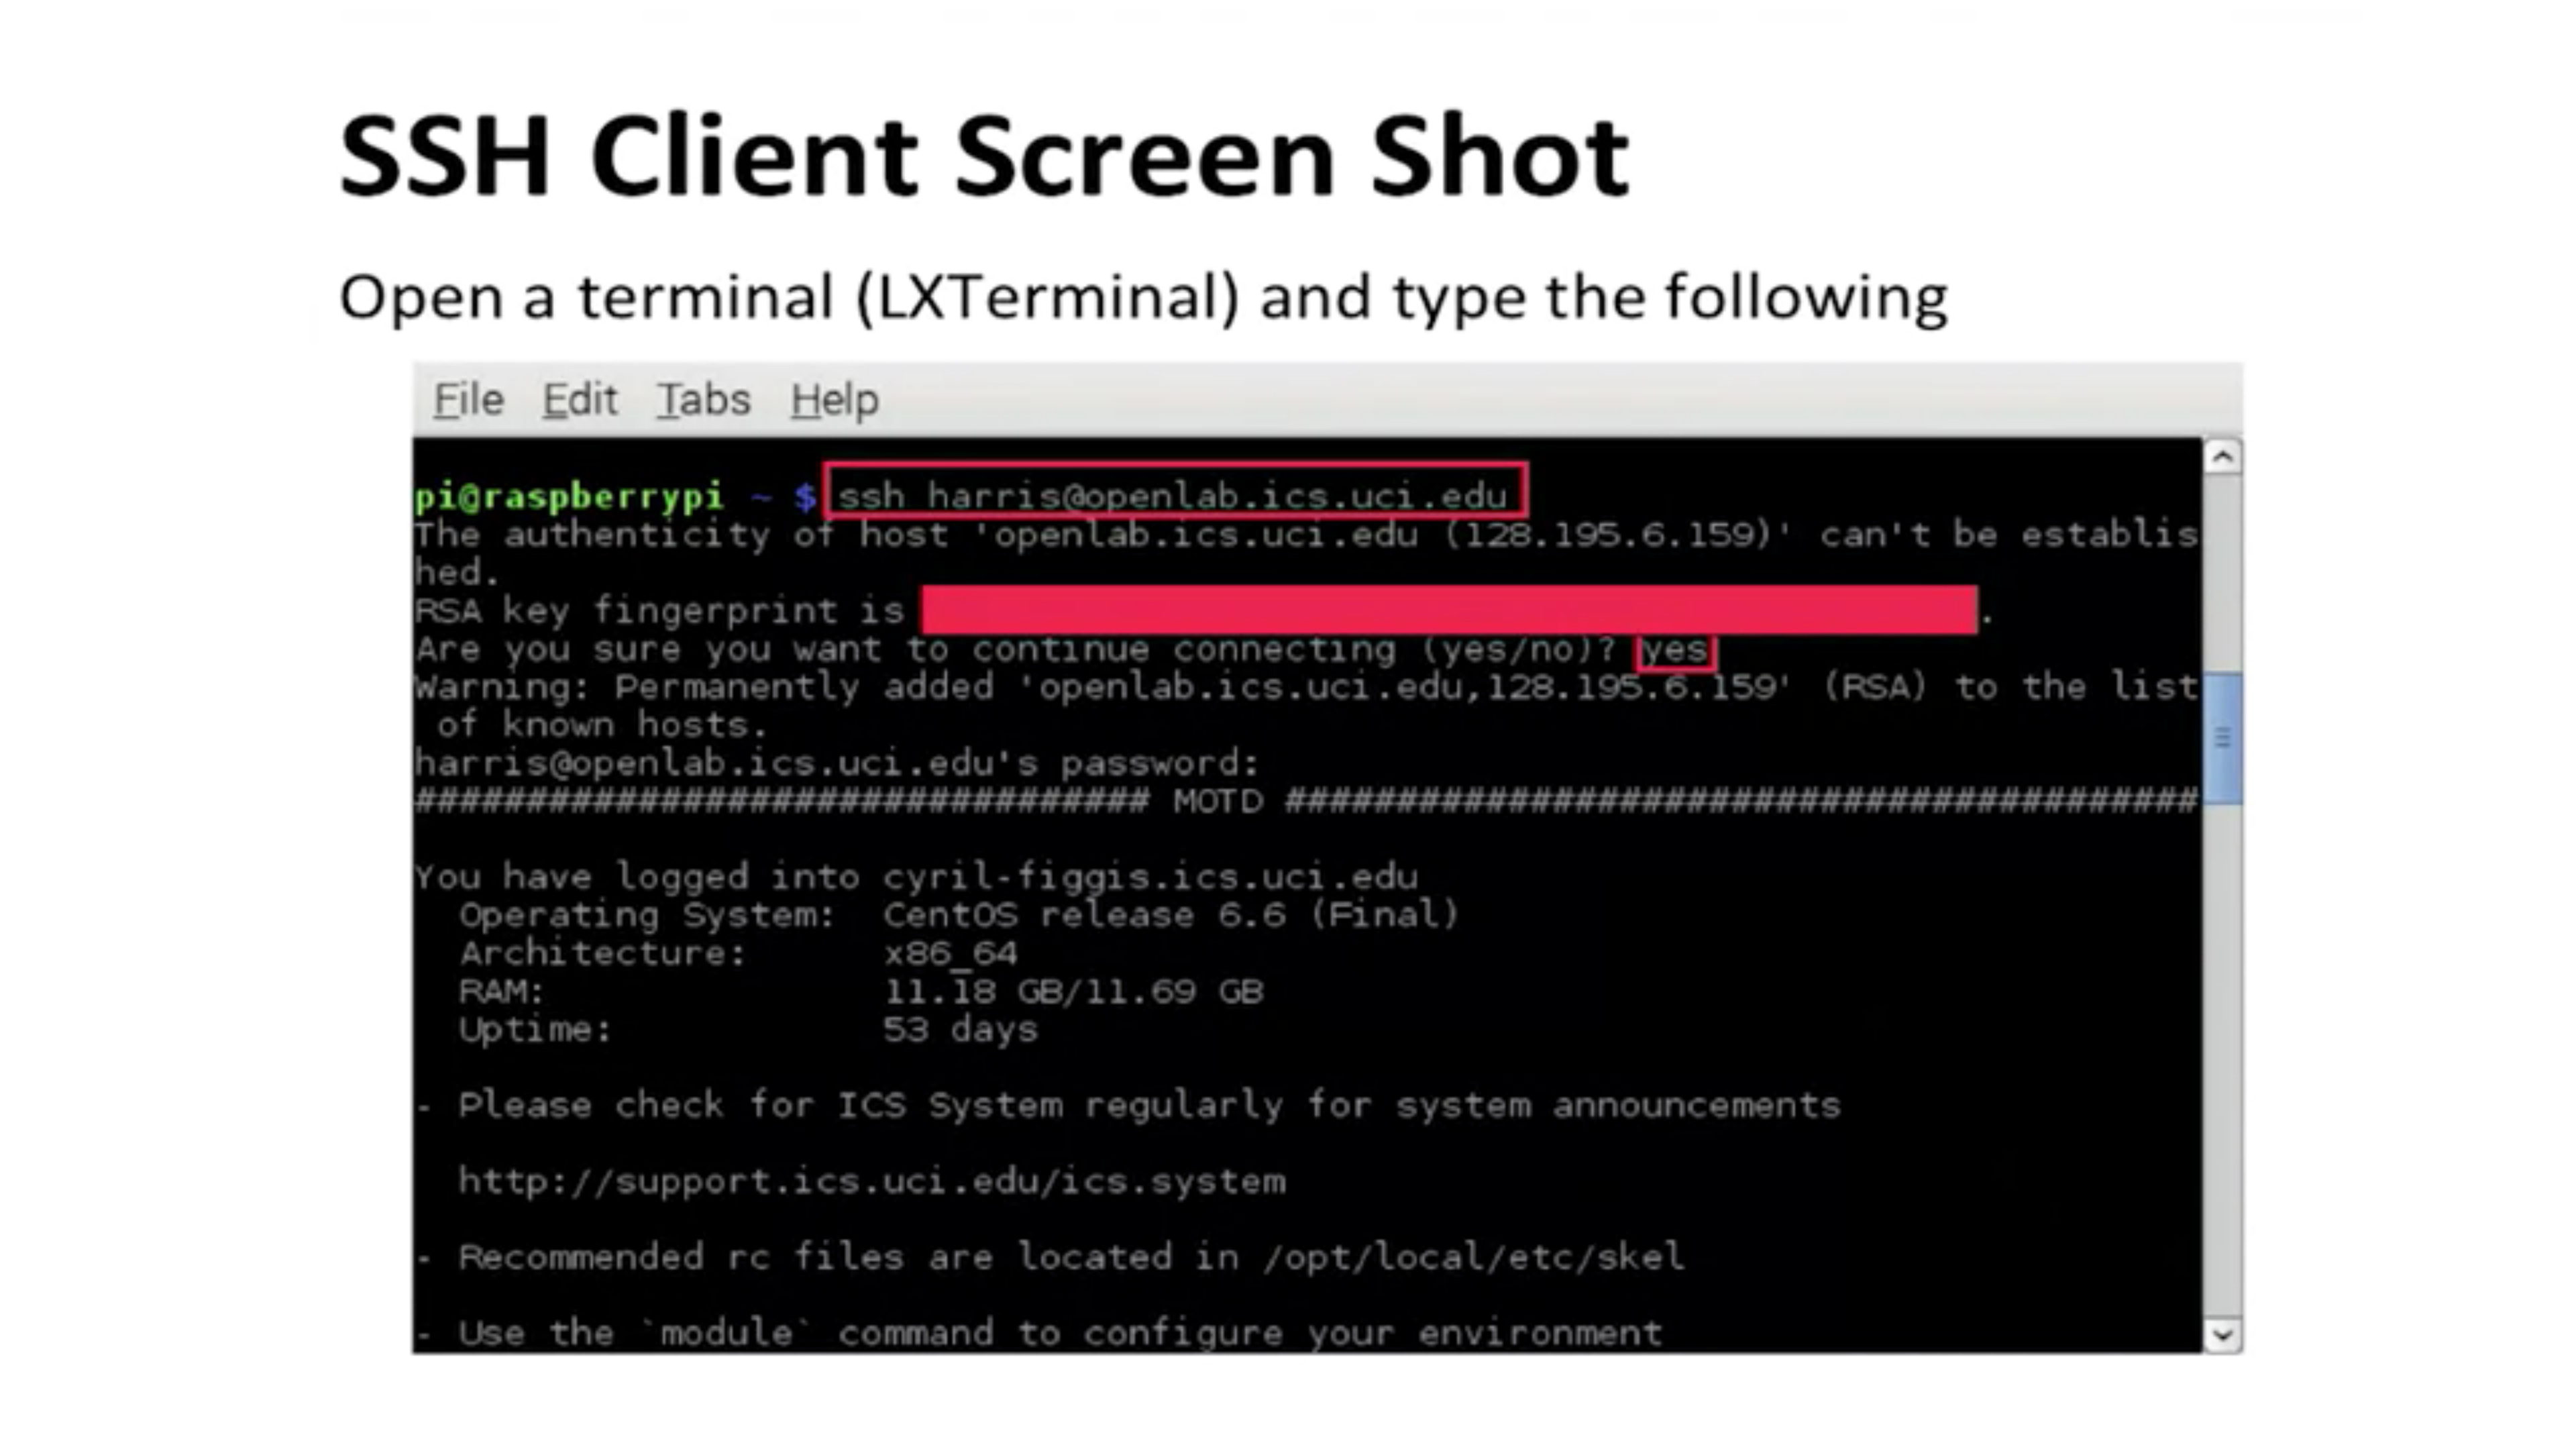
The first time I make the connection it will give what looks like an error. It'll say that the address could not be authenticated. It always does that the first time.
And after you type in the password, you'll see exactly what you would see if you were sitting at the machine, which will eventually be a prompt. You'll get a command line prompt, a dollar sign or whatever the prompt looks like. And you can type in your commands. So that's basically what you expect to happen. So let me show you what it looks like when I did it.
So I went to Raspberry Pi, opened up LXTerminal, and you can see at the top I circled in red my command. So I said secure shell, ssh [email protected]. So that's a machine that I can connect to. So it says, the authenticity of the host could not be established
So the Raspberry Pi has a secure shell server. Let's say if you want to connect to the Raspberry Pi remotely, it's useful to connect the Raspberry Pi without the keyboard and monitor, and all that.
SSH server is running by default in your Raspberry Pi, so you don't have to do anything. You just power it up, and it'll be running.